Specifications don't have as big an impact in photography as they once did. In some cases, maybe. But specs are no longer the story you write home about.
Looking around helps paint this picture. Fujifilm’s flagship camera has a 16MP sensor, yet is popular for its color rendition, build quality, and unmatched viewfinder. Leica’s boutique-priced cameras shed megapixels in favor of style and size. And although Sony has attacked the specification war with the venerable a7R II and a7S II, it continues to excel with the less spec-aware model in the a7 II. General buyers value a wide range of features, and Canon and Nikon are bearing the brunt of this reality.

The [Olympus OM-D E-M5 Mark II](http://www.amazon.com/Olympus-OM-D-E-M5-Mark-Silver/dp/B00S6DBMOQ/ref=sr_1_1?ie=UTF8&sr=1-1&s=photo&keywords=OM-D%2BE-M5%2BMark%2BII&tag=toolsandtoys-20&qid=1452561123) is considered the company's mid-range OM-D camera, but it safely sits atop the OM-D hill until the E-M1 Mark II is announced.
The Micro Four Thirds arena expresses this better than any other system. The inherent limitations of the small Micro Four Thirds sensor has allowed Panasonic and Olympus to get away from the specification game ahead of everyone else, and has allowed the companies to offer other features in lieu of 40MP sensors, 125,000 ISO ratings, and 1/32000 shutter speeds.

I'm a big believer in getting away from the technical side of photography in favor of experiencing more tangible features, like great electronic viewfinders, solid and robust build quality, and portability.
The Olympus OM-D E-M5 Mark II is the epitome of this head start.
Looking in the mirror
It’s unfortunate that the first decision out of the “better-than-iPhone” category is having to decide on a system. Systems are a vast, catastrophically large research undertaking, especially in the early stages of choosing a camera. A poorly researched purchase at the beginning of your hobby can have a lasting impact on your experience well into the future.
Over a year ago, Shawn wrote a personal review of the OM-D E-M10 and described his thought process behind his camera purchase:
I know that if I had a bigger bulkier camera, I’d be much less prone to doing these awesome photos. Portability, affordability, and battery life are huge assets for me.
Before diving in, Shawn outlined what he valued and what he wanted in his camera.
I value different aspects myself, and what I value has changed over time. I looked at the wide array of photography kit a few years ago and became overwhelmed with the cost of photography. Full frame systems command a daunting price, and having the best of any camera system will ultimately hurt your wallet. When I made the decision to go with an OM-D E-M10, I was driven by price.
I got lucky. Because since then, my priorities have changed. I still value portability and affordability like Shawn, but I now have an immense appreciation for expandability, connectivity, and customizability. And within the Micro Four Thirds system, there are options that satisfied the gear-hungry obsessions inside me.

The OM-D E-M5 Mark II, as the mid-range OM-D camera, offers the best features of the [OM-D E-M10](http://www.amazon.com/Olympus-Mirrorless-Digital-Camera-Silver/dp/B00HPQ09H6/ref=sr_1_8?ie=UTF8&sr=1-8&s=photo&keywords=OM-D%2BE-M10&tag=toolsandtoys-20&qid=1452561830) (or [E-M10 Mark II](http://www.amazon.com/Olympus-Mirrorless-Digital-Camera-Silver/dp/B016LKFEWG/ref=sr_1_9?ie=UTF8&sr=1-9&s=photo&keywords=OM-D%2BE-M10&tag=toolsandtoys-20&qid=1452561830)) and the [OM-D E-M1](http://www.amazon.com/Olympus-Mirrorless-Digital-Camera-3-Inch/dp/B00NGSLTBC/ref=sr_1_4?ie=UTF8&sr=1-4&s=photo&keywords=OM-D%2BE-M1&tag=toolsandtoys-20&qid=1452561891). The E-M5 Mark II incorporates the smaller and lighter package from the E-M10 with professional level features like the E-M1's faster shutter speeds and weather-proofed build quality.
I don’t believe all camera systems offer such a wide array of features. If you want portability and affordability, Olympus’ OM-D E-M10 (and new E-M10 Mark II) have you covered. If you value portability, yet still want to expand and customize the camera, the OM-D E-M5 Mark II fits like a glove. And if you want an ergonomic camera with professional level features, the OM-D E-M1 is a great choice.
I chose to go with the mid-range OM-D E-M5 Mark II. It provides just enough of the E-M10 (and E-M10 Mark II) and just enough of the E-M1 to keep me happy at all levels. In fact, I’d say the E-M5 Mark II is the best OM-D you can buy, no matter what Olympus says about its E-M1. Until the E-M1 Mark II comes out, the E-M5 Mark II reigns supreme in Olympus’ OM-D lineup of Micro Four Thirds cameras.
The Olympus OM-D E-M5 Mark II
The E-M5 Mark II is Olympus’ mid-range OM-D camera, offering features found in the entry level E-M10 and the flagship E-M1. Olympus’ current array of OM-D cameras may actually have the E-M5 Mark II at the higher end/more professional end of the series, but that could all change with a quick update to the E-M1.
In fact, I’m grateful it has more in common with the smaller, less expensive E-M10 and E-M10 Mark II. Without any grip attached, the E-M5 Mark II is hardly larger than the E-M10, making it almost pocketable in some situations. It also fits in the same sized spots in my camera bag.

I originally purchased a black OM-D E-M10, but I quickly fell in love with the silver option of the E-M5 Mark II. Something about the stylish silver body screams nostalgia, and I love whipping this guy out when it's time to take a snapshot.
But the likeness between the E-M5 Mark II and the E-M10 largely ends there.
In almost all ways, the E-M5 Mark II is a major step up from the E-M10 and an even bigger step up from the original E-M5. Here’s a quick rundown of step-ups from the E-M10:
- The E-M5 Mark II’s body is made of magnesium alloy and feels very well built. The E-M10 (and E-M10 Mark II) are made of plastic, and although the plastic is of a high quality feeling, it doesn’t measure up to the fit and finish of the E-M5 Mark II’s build.
- The magnesium alloy build of the E-M5 Mark II is weather sealed, allowing operation outdoors in the rain and in temperatures from -10º to +40º. Although the E-M10 can be used in colder temperatures, its body can not withstand the elements like the E-M5 Mark II’s weather sealed build.
- The E-M5 Mark II’s 5-axis image stabilization is one of the best stabilizers available on the market today. The original E-M10 featured 3-axis image stabilization, and the recently released E-M10 Mark II features the same 5-axis stabilization as the E-M5 Mark II.
- The E-M5 Mark II has six function buttons to be customized to your needs (if you include the video record button) and has a function switch which lets your dials control a second set of settings. The E-M10 features three function buttons.
- The E-M5 Mark II’s touch screen is articulating, great for videographers and those hard to reach angles. In contrast, the E-M10’s touch screen could be angled up or down.
- The E-M5 Mark II’s electronic viewfinder hits the 2.36 million dot range, noticeable the moment you put the camera to your eye. The E-M10’s electronic viewfinder is considerably smaller at 1.44 million dots.
- The E-M5 Mark II’s 16MP sensor has a “sensor shift” feature where, when mounted to a tripod, the camera shoots eight different images at slightly altered spots and combines them for a super high resolution 40MP image. This feature is unique to the E-M5 Mark II at this point.
- The E-M5 Mark II's shutter sound is spectacular — quick, quiet, and crisp. The E-M10's shutter sound is substantially quieter than the Sony a7 II or other cameras, but it doesn't measure up to the E-M5 Mark II's crispness.
There are many more major step ups from the E-M10 which can be found in a spec sheet (the biggest of which being an incredibly improved video system), but these are the differences I notice on a daily basis. Further, it’s not an entirely fair comparison; The OM-D E-M5 Mark II comes in at $1100 (currently $900 on Amazon), while the original E-M10 can be had for only $450. This is a huge price difference and certainly plays a role in the feature set of both cameras.
This is where your values play a large role in how the E-M5 Mark II can be evaluated. From my armchair, the E-M5 Mark II’s capabilities far outweigh the price difference from Olympus’ entry level camera. The E-M5 Mark II fits my portability/expandability/customizability checklist with ease and has me looking forward to Olympus’ future E-M1 Mark II camera.
Portability
I already mentioned the overall size of the E-M5 Mark II, but portability to me extends beyond the camera’s size. I also appreciate a camera’s shape, the body materials, and a camera’s weather sealing when considering if the camera can be taken with me.

The E-M5 Mark II's weather sealing is a must have for shooters in cold environments. Summers get hot, yes, but our winters get tremendously cold. Although the E-M5 Mark II is only rated to operate effectively down to -10 Celsius, this 10 degrees is a substantial improvement over the E-M10 and over many competitor camera bodies.
The E-M5 Mark II’s body is squarer than any prior OM-D camera, and I love the edgy attitude it gives off. A head on glimpse of the camera portrays broad shoulders and a sturdy trunk, giving off a sense of style and polish. My silver E-M5 Mark II’s knurled knobs glisten in bright light and hearken back to Olympus’ older — and considerably more stylish — OM DSLRs.
The E-M5 Mark II is also considerably thicker and denser in the hand than the E-M10. The thicker body provides a better grip (without the external grip) and a more premium feel. The E-M5 Mark II’s first impression seems much the same as other OM-Ds, but picking it up often yields a respective woah.
I’ve mentioned this a few times already, but the thicker, denser, squarer E-M5 Mark II is also weather sealed. I truly appreciate this detail, especially as we enter the harsh winter months. All the E-M5 Mark II’s buttons have a slightly squishier feeling than a non-weather sealed OM-D, and all the camera’s I/O ports are covered with a rubberized plastic to prevent dust and water from getting through.
Of course, in order to take true advantage of the camera’s weather sealing, you need to be using a weather sealed lens as well. Lenses such as Olympus’ PRO zooms — we’ve reviewed the 12-40mm f/2.8 PRO and the 40-150mm f/2.8 PRO in the past — pair very nicely with the E-M5 Mark II. Add the 7-14mm f/2.8 PRO to a kit with the E-M5 Mark II, and you’re looking at a three lens/one camera combo reaching nearly every focal length imaginable at just about any geographic location imaginable.

Handling the E-M5 Mark II is as good as you could ask for an OM-D body, although the E-M1 may take the cake in terms of ergonomics. Small adjustments to the E-M5 Mark II's front grip make holding this camera with a small lens quite pleasant, but anything as large as the [Panasonic Leica DG Nocticron 42.5mm f/1.2](http://www.amazon.com/Panasonic-H-NS043-Lumix-NOCTICRON-42-5mm/dp/B00HXE4GZQ/ref=sr_1_1?ie=UTF8&sr=1-1&s=photo&keywords=Nocticron&tag=toolsandtoys-20&qid=1452562354) lens becomes more difficult.
To my mind, portability extends to how the camera body is handled as well. It’s one thing to be small and light, but an entirely different thing to be accessible and operable under any circumstance.
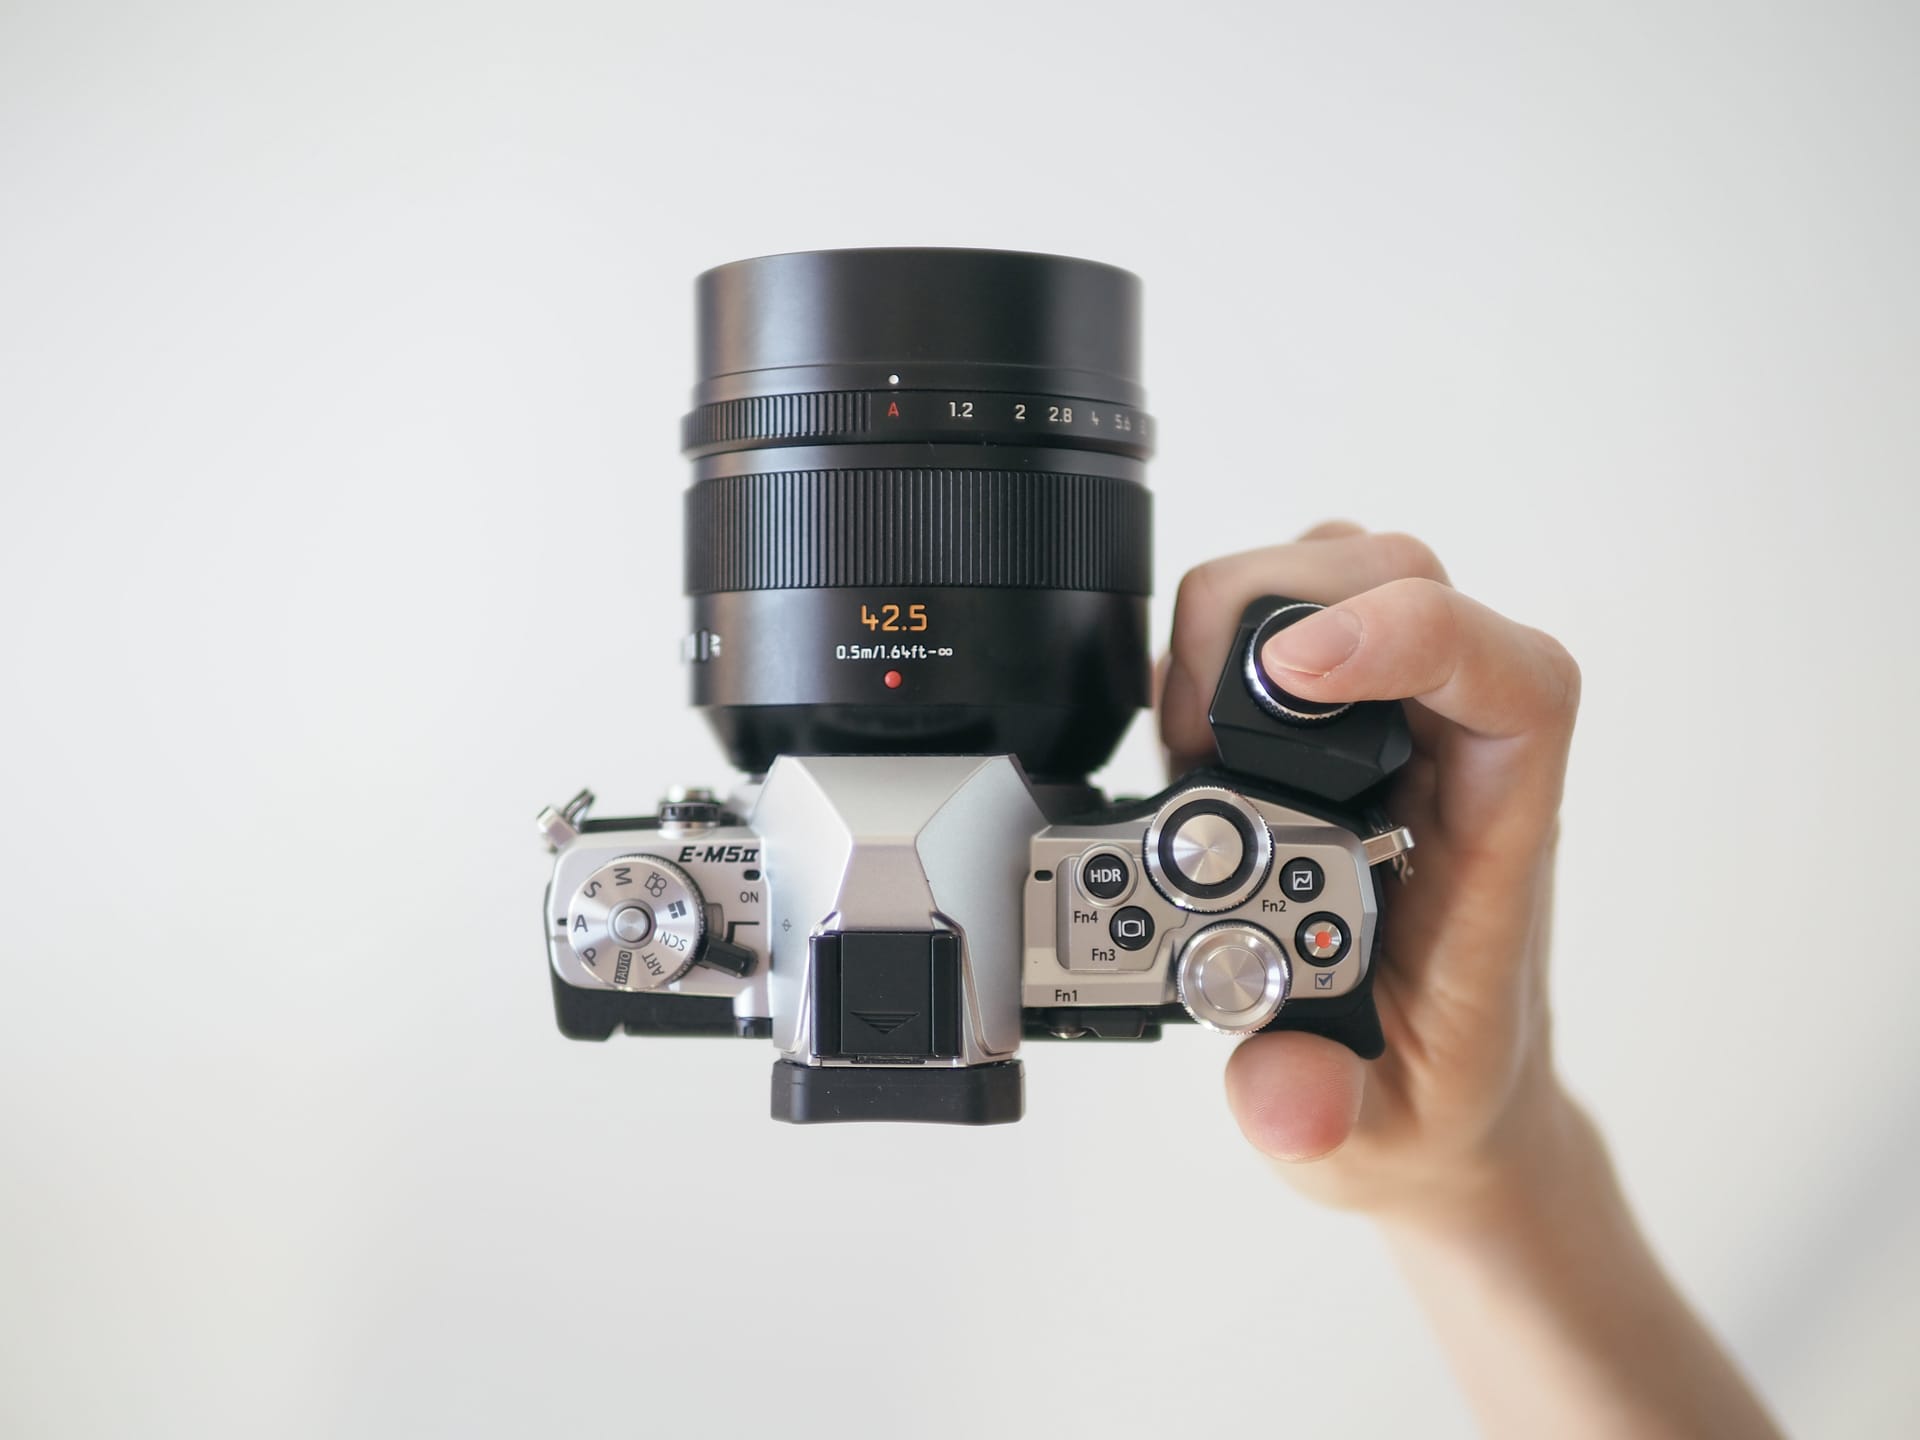
To this end, the E-M5 Mark II has two knurled knobs on the right which control a variety of settings depending on your shooting mode, as well as a wide range of function buttons which can be mapped to a variety of settings.

The rear right side also has an improved thumb grip, giving your hand more leverage on the camera body when a larger lens is attached. The grip is covered with a faux-like leather, but it's grippy enough when it gets cold outside or when your hands are sweating on a hot day.

The back side of the E-M5 Mark II is very simple, with a directional pad and four buttons. The buttons all have a fair click to them considering their weather sealed nature, and it doesn't take long to train yourself on where these buttons are.
The back panel has a directional pad with four simple buttons ready to take you to any part of the camera’s operating system. As time has gone by, I increasingly value the placement of these buttons, as well as the nifty function switch and button to the very right of the EVF. With my right hand only, I can control aperture, exposure compensation, white balance, ISO, focus mode, focus point, and access to the menu.

Each knurled dial is a lesson in machined precision and looks fantastic to the eye. These dials are very grippy, even with sweaty or cold hands. Unfortunately, the dials can turn *too* easily, especially the right side dials controlling your shooting settings.

The top left plate houses the shooting mode dial and the On/Off switch. The dial can be locked into place with the middle bush button lock mechanism, making this dial the most secure of the bunch. The placement of the On/Off switch is a great improvement over the E-M10, but I still wish the switch would be on the right side to make the entire camera operable with only your right hand.
Unfortunately, I can’t turn the camera on with my right hand. Olympus placed the On/Off switch to the left of the EVF hump, beside the shooting mode dial. This is a vast improvement over the placement of the switch on the back panel like on the OM-D E-M10, but it’s not perfect. While you can operate the entire camera with your right hand, you still must use two hands to fire it up.

The back LCD screen is touch sensitive and has a very high resolution and refresh rate. I don't find myself shooting with a live view very often, but when necessary, I've never had any issues with reflections or intense fingerprints blocking my view.

The touchscreen can swivel, which many videographers will be extremely happy with. I, however, can't stand this feature. It takes too much effort to pull the screen away from the camera body and I don't like how the screen dangles off to the side. I greatly prefer the E-M10's pull-out screen to the E-M5 Mark II's swivel screen.
Olympus goes a step further with the back panel touchscreen. The touchscreen dominates the back side of the E-M5 Mark II and can be pulled out to swivel of to the left of the camera body for videography or for those awkward viewing angles. Videographers will rejoice, surely, but I don’t have the same appreciation for the screen. The E-M10’s screen pulls out and angles up or down only, but this makes it easier to operate with one hand while close to your body. The E-M5 Mark II’s swivel touchscreen requires a second hand to pull out properly, and I don’t trust the screen hanging off on the side.
That said, by making the E-M5 Mark II a largely one-handed camera and by adding a swivel screen, Olympus opens up the ability to use the E-M5 Mark II in a new variety of ways. This improves the camera’s portability and accessibility and is the biggest reason why I love this camera. The E-M5 Mark II is a high quality take-anywhere kind of camera, ready in a pinch, rain or shine.
Customizability
The E-M5 Mark II is set apart from the baseline OM-D E-M10 (and E-M10 Mark II) by its customizability and expandability. The E-M5 Mark II serves to rectify the short list of the E-M10’s shortcomings, and it does so in exceeding fashion.

The top right plate has numerous function buttons and two more are scattered on the front and back of the camera. In total, the E-M5 Mark II's six function buttons can be customized to a plethora of settings. I really like the back-side function button with a switch that converts the dials from your primary settings to a secondary set of settings, like ISO and white balance.
For one, the E-M5 Mark II is riddled with customizable function buttons. The top plate has three buttons to choose from and a fourth if you decide to map the record button to a different function. On the back side, the button beside the viewfinder provides a fifth function button and the switch allows your top right dials to be mapped to different settings. To top it off, the front of the camera beside the lens mount has a sixth function button which can be mapped in the same way as any of the other function buttons. There are dozens of combinations for these function buttons and they can be fine-tuned to your shooting style quickly and easily in the menu system.
My combination looks something like this:
- Fn 1 (button beside viewfinder): Resets autofocus area
- Fn 2: Toggle between autofocus and manual focus
- Fn 3: See the Super Control Panel
- Fn 4: Toggle “HDR” on or off
- Fn 5: Record video
- Fn 6 (front button beside lens mount): Magnification for manual focus assist

The front function button is also very handy. I have this button primed for magnification when I'm shooting with manual focus. However, if you're using a bulky lens like the [Olympus 40-150mm f/2.8 PRO](http://www.amazon.com/Olympus-M-ZUIKO-40-150mm-Interchangeable-Panasonic/dp/B00NGSLSK4/ref=sr_1_1?ie=UTF8&sr=1-1&s=photo&keywords=40-150mm%2Bf2.8%2Bpro&tag=toolsandtoys-20&qid=1452563059) zoom or the Leica DG Nocticron 42.5mm f/1.2, this button can be hard to press sometimes.
If you add an Olympus PRO lens to the E-M5 Mark II, you’re looking at seven different function buttons. This could be unprecedented.

The right side of the camera houses the single SD card slot. This is fairly standard for mirrorless cameras these days, but I'd appreciate a second SD card slot for backing up or for spillover storage. Also, the placement of this SD card slot is far superior to the E-M10's placement inside the battery compartment on the bottom plate.
There are a few smaller, less heralded features that I am thankful for, especially in comparison to the E-M10.
The battery compartment. I appreciate the size of the open/close switch and the way the compartment door swings open once you flip the switch. I do wish, however, that both the E-M10 and E-M5 Mark II used the same batteries — having to carry two separate chargers in a bag is no fun.
The SD card slot. Although the E-M5 Mark II doesn’t come with a second SD card slot, the single slot is positioned on the right side of the camera body. This means you don’t have to open the battery compartment door to insert the SD card, or, if you use the E-M5 Mark II almost exclusively with the horizontal grip, you can leave the grip attached when taking out or inserting an SD card. The original E-M10 grip’s biggest flaw was that it had to be removed in order to access the SD card slot in the battery compartment.
The hot shoe and adjustable flash. Olympus neglected to give the E-M5 Mark II its own built-in flash, instead opting to provide a small, adjustable flash in the box. This adjustable flash is far and away better than the built-in flash found on the E-M10, as you can fire bursts of light off of ceilings or side walls to eliminate those harsh bits of white light.
The Super Control Panel. Olympus’ Super Control Panel sometimes goes unnoticed, but it’s my single favorite display view thanks to how quickly you can customize and change your shooting settings. The Super Control Panel has a number of buttons that can be tapped and then scrolled through via dials. This is especially handy for changing ISO and white balance settings when you have a flash attached to the hot shoe.
The knurled dials. The E-M5 Mark II’s knurled dials are truly something to behold. The silver OM-D body glistens in bright light and the small knurls in the dials provide an extra amount of flair. They look fantastic. That said, the dials spin too easily. More than once, I’ve casually grazed a dial without realizing I’ve changed my exposure compensation or aperture setting. A little extra friction would be a nice addition to a Mark III model.
And this doesn’t include the plethora of video capabilities under the E-M5 Mark II’s wing. I don’t use a camera for any video purposes, so I’ll stray away from making any comments. However, the 5-axis in-body image stabilization does wonders to smooth your video and the customization of video files looks to fill a big void in Olympus’ OM-D lineup.

The E-M5 Mark II comes with its own proprietary battery, meaning you can't bring along an E-M10 and E-M5 Mark II on a trip with only one battery charger.
The level of customization available on the E-M5 Mark II is what makes it the ultimate camera for me. If I want to head out for a walk with my wife, I can bring just the E-M5 Mark II and the Pana Leica Summilux 15mm f/1.7 lens for some street photography. If something catches my eye and my settings aren’t just right, making changes is as easy as using my right hand to press any of the six function buttons or rotate one of the two dials. With one hand, 95% of the camera’s features can be implemented on the spot. And it’s all thanks to the level of customization provided by those buttons and dials.
Expandability
For as far as the E-M5 Mark II’s customization options take the camera’s experience, its expandability is where the camera truly exceeds expectations. For me, this means extensive use of the add-on horizontal grip and adjustable flash. For others, it may mean wireless lighting systems, waterproof housings, vertical battery grips, and even better on-board flashes.
The HLD-8G Grip
I firmly believe the OM-D E-M5 Mark II should always be bought with the add-on HLD-8G grip. It changes the way the camera is operated (for both good and bad — mostly good though), how it’s held, and if you take it the full length, what kind of images you shoot.

In my opinion, the [HLD-8G horizontal grip](http://www.amazon.com/Olympus-External-Grip-HLD-8G-OM-D/dp/B00STQXSRY/ref=sr_1_1?ie=UTF8&sr=1-1&s=photo&keywords=HLD-8G&tag=toolsandtoys-20&qid=1452563210) is a must-have for any E-M5 Mark II owner.
The HLD-8G grip attaches to the E-M5 Mark II via the tripod mount on the bottom plate of the camera and connects with the camera body via the covered pin connectors. The horizontal grip uses these pins to offer shutter button and front dial connectivity to the camera body, but also to provide power to the camera body if the additional HLD-6P vertical battery grip is attached. So, you have a pin connector on the bottom of the camera body covered by a rubber cover which connects to the horizontal grip, and the same thing on the bottom of the horizontal grip to attach to the additional vertical battery grip. In effect, the entire grip package is a two piece set, ready for those times when you want extra battery power or for when you need better ergonomics in a smaller case.

The HLD-8G horizontal grip has its own shutter button and front dial, meaning it has to communicate with the camera somehow.

Just remove the pin connector's cover and screw the HLD-8G grip into place. The grip itself has the exact same covered pin connector on its own bottom, ready to be connected to the [HLD-6P vertical battery grip](http://www.amazon.com/Olympus-External-consists-HLD-8G-battery/dp/B00STQY0G2/ref=sr_1_2?ie=UTF8&sr=1-2&s=photo&keywords=HLD-8G&tag=toolsandtoys-20&qid=1452563210) if necessary.
As can be seen, I opted to stay away from the vertical battery grip in favor of the smaller horizontal grip. I’ve recently been eyeing the vertical battery grip thanks to an increasing passion to shoot portrait images, but I haven’t taken the plunge yet. Both pieces add considerable size and heft to the tiny E-M5 Mark II body, so I was afraid of defeating the purpose of my purchase.
The HLD-8G looks a bit unsightly on the silver E-M5 Mark II. The grip comes in black only and doesn’t fully adopt the same shape as the camera body itself. The back corner of the E-M5 Mark II and HLD-8G grip don’t align perfectly, making it feel like you’re using a third-party grip rather than the Olympus-made option.
It also doesn’t sit perfectly flush with the front of the E-M5 Mark II, either. There is about 1/16” separation between the camera body and the grip, making it feel like something is lined up or is screwed in improperly. But once you realize the grip can’t be bent and that it’s as secure as you could ask for, you quickly forget it’s there.

There is little wrong in the way of the E-M10's add-on grip, but it does require you to remove the grip in order to access the SD card slot. The E-M5 Mark II's grip of course does not cover the SD card slot door, meaning the grip stays on my camera far more than it stays off my camera.
Which is important, because although the grip is an add-on accessory, it feels like it should be a part of the camera body. The grip itself is sculpted wonderfully, allowing the camera to sit in your hand with no worry of falling or slipping. And it provides far better support for shooting portrait images than if you bravely used the camera body on its own.
The grip’s shutter button is properly positioned and the dial surrounding the shutter is also comfortable to use. Even more fortunate is the amount of friction in that front grip dial — the grip’s dial feels like the best of the three dials on-board and is the least likely to spin if you graze it by accident.

The extra grip provides a big improvement in stability when hand holding the E-M5 Mark II. I believe the grip is mandatory for any larger-than-average lenses. While the grip does drastically improve ergonomics, it hinders functionality slightly — reaching the function buttons on the top plate requires a re-adjustment of your grip on the camera.
Aside from how it looks, the only other unfortunate aspect of the grip is how it affects your accessibility to the E-M5 Mark II’s function buttons. The top plate’s function buttons — especially Fn3 and Fn4 — are positioned a long ways from your index finger, making it difficult to use those buttons to make settings changes.
I’ve adapted to this using two methods:
- I’ve changed Fn3 and Fn4 to be two function buttons used on occasion and not important to the shooting process.
- I’ll shift my grip to have my middle fingertip on the shutter button with my index finger on top ready to press buttons.
Method #2 works fairly well, although it does compromise your grip of the camera slightly.

As I've mentioned, the HLD-8G grip improves ergonomics drastically. However, it does make operating some elements of the camera body more difficult than necessary. The example of the [Panasonic Leica DG Summilux 25mm f/1.4](http://www.amazon.com/Panasonic-H-X025-Lumix-SUMMILUX-Aspherical/dp/B0055N2L22/ref=sr_1_5?ie=UTF8&sr=1-5&s=photo&keywords=panasonic%2B25mm&tag=toolsandtoys-20&qid=1452563662) to the right shows how much finger space there is between the lens and the grip.

Here we see the grip with the [Panasonic Leica DG Summilux 15mm /1.7 lens](http://www.amazon.com/Panasonic-H-X015K-LEICA-SUMMILUX-15mm/dp/B00J8HV6DG/ref=sr_1_4?ie=UTF8&sr=1-4&s=photo&keywords=panasonic%2B15mm&tag=toolsandtoys-20&qid=1452563699). This is one of my favorite lenses thanks to how it handles with the E-M5 Mark II and grip attachment. The grip leaves plenty of space for your fingers to operate the front function button, and the entire package is very small and light.
Unfortunately, the Panasonic Leica DG Nocticron 42.5mm f/1.2 is a different story than the other Pana Leica lenses. Here, the grip and lens get uncomfortably close to each other, rendering the front function button almost useless. That said, you'll still want the grip to properly handle this lens. It's one of the bigger varieties of Micro Four Thirds lenses (and also happens to be one of the most expensive ones), so extra stability is a must.
The grip also makes accessing the front function button a difficult ordeal. A wide, big-girth lens like the Pana Leica 42.5mm Nocticron gets uncomfortably close to the grip, making for a squished area for your finger tips and an even more frustrating time accessing that front function button. I’d wager larger fingers than mine may find it difficult to actually hold the E-M5 Mark II and grip and Nocticron all at once.

Despite the fact the HLD-8G grip doesn't line up nicely on the bottom of the camera and that the colors clash slightly with the silver OM-D, I still think the grip is as close to a must-have as you can get. For those times you don't need it, you can take it off. But you'll be happy to have the extra stability if you really dive into the Micro Four Thirds lens catalog.
Evidently, I’ve only expanded on the HLD-8G horizontal grip for the E-M5 Mark II and I’ve left out a fair number of other accessories. The E-M5 Mark II camera body itself is the very first purchase you make, but it represents the foundation on which other, more specialized accessories are added. The E-M5 Mark II is a jack-of-all-trades on its own, and it only becomes a master as you add grips, flashes, underwater housings, and videography accessories down the road.
40 MP High Resolution Mode, 5-Axis Image Stabilization, and Live Composite
The sensor inside Olympus’ OM-D cameras itself hasn’t advanced as far as the technology around it, so the resulting images are largely the same no matter which OM-D model you are using. I imagine this will change shortly, as Sony introduced a 20MP Micro Four Thirds sized sensor in 2015 which has already been incorporated into Panasonic’s newest GX8 camera body. With that in mind, photographs from the E-M5 Mark II will only be differentiated by the lens in use.

Lens: [Panasonic Leica DG Summilux 15mm f/1.7](http://www.amazon.com/Panasonic-H-X015K-LEICA-SUMMILUX-15mm/dp/B00J8HV6DG/ref=sr_1_4?ie=UTF8&sr=1-4&s=photo&keywords=panasonic%2B15mm&tag=toolsandtoys-20&qid=1452563699).

Lens: [Panasonic Leica DG Summilux 25mm f/1.4](http://www.amazon.com/Panasonic-H-X025-Lumix-SUMMILUX-Aspherical/dp/B0055N2L22/ref=sr_1_5?ie=UTF8&sr=1-5&s=photo&keywords=panasonic%2B25mm&tag=toolsandtoys-20&qid=1452563967).

Lens: [Olympus 40-150mm f/2.8 PRO](http://www.amazon.com/Olympus-M-ZUIKO-40-150mm-Interchangeable-Panasonic/dp/B00NGSLSK4/ref=sr_1_1?ie=UTF8&qid=1452563059&s=photo&keywords=40-150mm%252Bf2.8%252Bpro&tag=toolsandtoys-20&sr=1-1).
40MP High Resolution Mode
As I said though, the technology around the sensor has pushed ahead at an incredible pace, and this comes to head with the 40MP high resolution shooting mode. Although it takes a bit to find the option in the menus, the 40MP high resolution shooting mode is made for landscapes and still life photography. When the shutter is fired, the camera shoots eight different images while shifting the sensor ever so slightly. The camera pauses to stitch the eight shots together and forms a massive 40MP image with incredible detail. This is a truly brilliant way of turning the inherent limitation of the Micro Four Thirds sensor size on its head.

Lens: [Panasonic Leica DG Summilux 15mm f/1.7](http://www.amazon.com/Panasonic-H-X015K-LEICA-SUMMILUX-15mm/dp/B00J8HV6DG/ref=sr_1_4?ie=UTF8&qid=1452563699&s=photo&keywords=panasonic%252B15mm&tag=toolsandtoys-20&sr=1-4).
Unfortunately, it comes at a cost: You have to use a tripod when shooting in high resolution mode. Because the sensor shifts eight different times, any movement in your subject will result in reverberations across your image. This eliminates any hope in catching extra detail in a person’s face or at a sports event where there is lots of movement.

Lens: [Panasonic Leica DG Nocticron 42.5mm f/1.2](http://www.amazon.com/Panasonic-H-NS043-Lumix-NOCTICRON-42-5mm/dp/B00HXE4GZQ/ref=sr_1_1?ie=UTF8&qid=1452562354&s=photo&keywords=Nocticron&tag=toolsandtoys-20&sr=1-1).
And, to add insult to injury, the 40MP high resolution mode will surely put your computer to the test. Shortly after adding the E-M5 Mark II to my arsenal, I shot a review with the 40MP high resolution mode and added the photos to my iMac. I had some 16MP images mixed in with the 40MP images, and the entire computer would freeze for a few seconds when I flipped to a 40MP image. Editing that 40MP image was also extremely difficult, as brush edits would stutter and lag behind my mouse stroke. I quickly decided the extra detail wasn’t worth the hassle, especially since the images are generally shrunk down for publishing on the web.

Lens: [Panasonic Leica DG Summilux 15mm f/1.7](http://www.amazon.com/Panasonic-H-X015K-LEICA-SUMMILUX-15mm/dp/B00J8HV6DG/ref=sr_1_4?ie=UTF8&qid=1452563699&s=photo&keywords=panasonic%252B15mm&tag=toolsandtoys-20&sr=1-4).
Regardless of the mode’s limitations, the 40MP high resolution mode will surely be welcomed by a specific group of photographers. It sidesteps the limitations of the smaller Micro Four Thirds sensors and adds incredible amounts of detail to your images. For the right person, the 40MP shooting mode built into the small and compact E-M5 Mark II body will fit the bill perfectly.
5-Axis Image Stabilization
The OM-D E-M5 Mark II’s hallmark feature may very well be its 5-Axis Image Stabilization for improved low-light shooting. The entire process works under the hood, but when comparing cameras side-by-side, the difference can be tremendous.

Lens: [Panasonic Leica DG Nocticron 42.5mm f/1.2](http://www.amazon.com/Panasonic-H-NS043-Lumix-NOCTICRON-42-5mm/dp/B00HXE4GZQ/ref=sr_1_1?ie=UTF8&qid=1452562354&s=photo&keywords=Nocticron&tag=toolsandtoys-20&sr=1-1).

Lens: [Panasonic Leica DG Nocticron 42.5mm f/1.2](http://www.amazon.com/Panasonic-H-NS043-Lumix-NOCTICRON-42-5mm/dp/B00HXE4GZQ/ref=sr_1_1?ie=UTF8&qid=1452562354&s=photo&keywords=Nocticron&tag=toolsandtoys-20&sr=1-1).
Getting into the nitty gritty details of a 5-Axis Image Stabilization discussion is not my forte, however. This discussion is meant for people who have tested different makes and models of cameras side-by-side and who know what they’re looking for.
My experience is limited, to say the least. I had a chance to see how the E-M5 Mark II works in low light when shooting some photos during my sister’s wedding in September. The venue was very poorly lit, and any shot snapped with the OM-D E-M10 turned out to be garbage.
In contrast, with the 42.5mm Nocticron strapped to its hip, the E-M5 Mark II came through. I was able to capture the father/daughter dance as well as the first dance with only a few unusable photos, and I was surprised by how low the E-M5 Mark II’s shutter speed could get. The majority of the shots during the dances were between 1/30 and 1/60 of a second, which seems incredible considering the movement taking place during a wedding dance. The E-M5 Mark II’s stabilizers came through that evening and my sister was extremely happy to have a few extra photographs to add to her memory books.

Lens: [Panasonic Leica DG Summilux 15mm f/1.7](http://www.amazon.com/Panasonic-H-X015K-LEICA-SUMMILUX-15mm/dp/B00J8HV6DG/ref=sr_1_4?ie=UTF8&qid=1452563699&s=photo&keywords=panasonic%252B15mm&tag=toolsandtoys-20&sr=1-4).
The above image was shot at 1/15 of a second, and each individual tree branch is tack sharp up against the setting sun. Again, the stabilizers in the E-M5 Mark II are tremendous.

Lens: [Panasonic Leica DG Summilux 25mm f/1.4](http://www.amazon.com/Panasonic-H-X025-Lumix-SUMMILUX-Aspherical/dp/B0055N2L22/ref=sr_1_5?ie=UTF8&qid=1452563662&s=photo&keywords=panasonic%252B25mm&tag=toolsandtoys-20&sr=1-5).
I’ve watched a few Youtube videos on the E-M5 Mark II as well and it appears the 5-Axis Image Stabilization is an incredible improvement for videographers. I recommend checking out the videography part of this video to see the effect of 5-Axis Image Stabilization in the E-M5 Mark II. In short, the improvement looks incredible.
Live Composite
Although a small, relatively unknown feature for OM-D cameras, Live Composite is a functional way to capture long exposures late at night. It’s as simple as setting the camera to Manual, scrolling your shutter speed dial all the way to the left until it says “LIVECOMP”, and then following the on-screen options. It takes a little bit of playing around, but capturing long exposures with Live Composite becomes a breeze in a short amount of time. You can even view the creation of the image in live time on the LCD screen. It’s brilliant.

Lens: [Panasonic Leica DG Summilux 25mm f/1.4](http://www.amazon.com/Panasonic-H-X025-Lumix-SUMMILUX-Aspherical/dp/B0055N2L22/ref=sr_1_5?ie=UTF8&qid=1452563662&s=photo&keywords=panasonic%252B25mm&tag=toolsandtoys-20&sr=1-5).

Lens: [Panasonic Leica DG Summilux 25mm f/1.4](http://www.amazon.com/Panasonic-H-X025-Lumix-SUMMILUX-Aspherical/dp/B0055N2L22/ref=sr_1_5?ie=UTF8&qid=1452563662&s=photo&keywords=panasonic%252B25mm&tag=toolsandtoys-20&sr=1-5).
I experimented with Live Composite at length in the summer during Canada Day festivities, and the fireworks images were nothing short of awesome. They aren’t professionally captured fireworks images by any stretch, but I think the lengthy strands of light look something akin to a painting. To be able to capture this directly in camera without stitching any photos together in post-production afterwards is a win in and of itself.
Some Other Image Samples
As advertised, the E-M5 Mark II is an Olympus OM-D camera through and through. Olympus has set up its OM-D lineup quite nicely, with some fundamental features like 5-Axis Image Stabilization and big, bright viewfinders making it into all three OM-D models, while other, professional level features are left for the higher end OM-D models. The most fundamental feature of all — image quality — is the same right through the lineup.

Lens: [Panasonic Leica DG Nocticron 42.5mm f/1.2](http://www.amazon.com/Panasonic-H-NS043-Lumix-NOCTICRON-42-5mm/dp/B00HXE4GZQ/ref=sr_1_1?ie=UTF8&qid=1452562354&s=photo&keywords=Nocticron&tag=toolsandtoys-20&sr=1-1).

Lens: [Panasonic Leica DG Nocticron 42.5mm f/1.2](http://www.amazon.com/Panasonic-H-NS043-Lumix-NOCTICRON-42-5mm/dp/B00HXE4GZQ/ref=sr_1_1?ie=UTF8&qid=1452562354&s=photo&keywords=Nocticron&tag=toolsandtoys-20&sr=1-1).

Lens: [Panasonic Leica DG Nocticron 42.5mm f/1.2](http://www.amazon.com/Panasonic-H-NS043-Lumix-NOCTICRON-42-5mm/dp/B00HXE4GZQ/ref=sr_1_1?ie=UTF8&qid=1452562354&s=photo&keywords=Nocticron&tag=toolsandtoys-20&sr=1-1).
If anything, the OM-D lineup necessitates a good lineup of lenses. You know what you’re buying when you buy a Micro Four Thirds camera (fast autofocus, sharp images, and large depth of field as well as poor low-light performance and less blurry backgrounds), so it’s the lens that makes or breaks your image. I’m a huge fan of Panasonic’s Holy Trinity of prime lenses (the 15mm f/1.7, the 25mm f/1.4, and the 42.5mm f/1.2) and Olympus’ Holy Trinity of zoom lenses (the 7-14mm f/2.8, the 12-40mm f/2.8, and the 40-150mm f/2.8. With any of these lenses attached, the E-M5 Mark II’s potential really comes to the forefront.

Lens: [Panasonic Leica DG Nocticron 42.5mm f/1.2](http://www.amazon.com/Panasonic-H-NS043-Lumix-NOCTICRON-42-5mm/dp/B00HXE4GZQ/ref=sr_1_1?ie=UTF8&qid=1452562354&s=photo&keywords=Nocticron&tag=toolsandtoys-20&sr=1-1).

Lens: [Panasonic Leica DG Nocticron 42.5mm f/1.2](http://www.amazon.com/Panasonic-H-NS043-Lumix-NOCTICRON-42-5mm/dp/B00HXE4GZQ/ref=sr_1_1?ie=UTF8&qid=1452562354&s=photo&keywords=Nocticron&tag=toolsandtoys-20&sr=1-1).

Lens: [Panasonic Leica DG Nocticron 42.5mm f/1.2](http://www.amazon.com/Panasonic-H-NS043-Lumix-NOCTICRON-42-5mm/dp/B00HXE4GZQ/ref=sr_1_1?ie=UTF8&qid=1452562354&s=photo&keywords=Nocticron&tag=toolsandtoys-20&sr=1-1).

Lens: [Panasonic Leica DG Nocticron 42.5mm f/1.2](http://www.amazon.com/Panasonic-H-NS043-Lumix-NOCTICRON-42-5mm/dp/B00HXE4GZQ/ref=sr_1_1?ie=UTF8&qid=1452562354&s=photo&keywords=Nocticron&tag=toolsandtoys-20&sr=1-1).
There’s always some room for improvement though.
Tighter dials. Although the E-M5 Mark II’s knurled dials look gorgeous, they spin too easily. A little tighter dial would go a long way in ensuring settings aren’t changed after a random graze.
A relocated On/Off switch. I highly value how the E-M5 Mark II can be operated almost entirely with your right hand. I think Olympus should take it the full step further and put the On/Off switch on the right side of the camera to allow full one handed operation.
A higher resolution sensor. Sony has made the technology available for all Micro Four Thirds manufacturers, so I see no reason why the next iteration of this camera wouldn’t include the higher resolution 20MP sensor.
A 40MP High Resolution shooting mode without the need for a tripod. I think it’s only a matter of time before this shooting mode is available for handheld shooting, and I wouldn’t be surprised if we saw it in the upcoming E-M1 Mark II. If Olympus can execute this, they may find a way around the inherent limitations of the small Micro Four Thirds sensor.
Dual SD card slots. Very few mirrorless cameras have dual SD card slots built-in, and I’m starting to think this is a necessity. Whether you shoot RAW images and want the second SD card slot for spillover storage, or if you want to backup your shots while on-the-go, a second SD card slot would go a long way for photographers looking to make the plunge into the Micro Four Thirds system.
A non-swivel back LCD touchscreen. Yes, lots of potential buyers screamed for the swivel screen, but I genuinely dislike it. I can’t stand how much more difficult it is to swivel out than the pull-out screen of the E-M10, and I don’t like how much the camera’s footprint increases with the screen dangling out on the left. I get that the E-M5 Mark II is supposed to be Olympus’ foray into the videography market, but that doesn’t mean I have to like its swivel screen.
A function button or two on the HLD-8G grip. My only complaint about the add-on HLD-8G horizontal grip is how it extends the distance to the camera’s control buttons on the top plate. If Olympus added a button or two that could be mapped to any of the other function buttons on the top plate, this would alleviate the awkward ergonomics of changing settings while using the grip.
Wrap-Up
I have to admit, I took too long to put this review together. I told myself I wanted extra time with the camera to give it the full love it deserves. That extra time allowed me to truly fall in love with this camera, but only to run into one of its downfalls. That downfall may be the OM-D’s demise in my arsenal.
That downfall is resolution. A recent project demanded a higher resolution image, and my beloved OM-D E-M5 Mark II couldn’t provide the resolution needed to get the job done.
So I gave in to the specification race and bought something else. That something else is an amazing camera itself and I’ll probably never leave the new system.
But the new camera doesn’t offer the types of features I’ve fallen in love with in the E-M5 Mark II. Features like the E-M5 Mark II’s humongous viewfinder, or its impeccable touchscreen, or its Super Control Panel, or its unbelievable customizability, or its one-handed operation are all completely left out of this new camera. Without a doubt, by not giving in to the specification race, Olympus has been able to push its cameras forward in other, more applicable areas.

My story doesn't end as well as other OM-D E-M5 Mark II's stories. My path ran into the E-M5 Mark II's biggest downside: resolution. Aside from the size and resolution of the Micro Four Thirds sensor — two things the E-M5 Mark II can not claim as a fault of its own — this camera is an absolute dream. I'd go so far as to say it's the best Micro Four Thirds camera you can buy at this very moment.
Throughout my work on this project, I’ve missed using my E-M5 Mark II. I truly enjoy the way the extra HLD-8G grip fits in my hand, and I love the size and shape of the broad-shouldered body. I really like how I can still pump out the occasional high resolution image if the circumstances are right. And, most of all, I’ve really enjoyed the images coming out of the sensor.
In the end though, some people actually do need to be careful around specifications. Sometimes the job demands more oomph, more flair, more pizazz. It’s unfortunate, but I have to be straight: the OM-D E-M5 Mark II may not measure up for the professional photographer out there.
Until a week ago, the E-M5 Mark II was the perfect camera for me. In fact, it still may be the perfect camera for me.
Olympus’ OM-D E-M5 Mark II takes the best aspects of the entire Micro Four Thirds world and combines it into one snazzy camera.
Just don’t ask how my story ended.