Let's get meta for a moment. I've been putting off this review for far too long.
At first, I told myself I wanted to have enough time with my new camera as to make sure what I wrote about it wasn't just a recital of what you'd find anyway in the online manual. But as I began writing this review over a month ago, I quickly came to grips with the true reason I'd been avoiding it: writing a pretty good camera review is extremely difficult.
On one end of the review spectrum you've got the feature checklist. Here are the camera's specs and features and functions. Here's how the camera performs in x, y, and z situations of low light or of a fast-moving subject. Yes, it is mechanically capable of taking photographs that can be printed out and hung on the wall or posted to Instagram.
Free Photography Guide: Download our Better than iPhone Photography guide to help you get started with you photo skills and camera basics. Along with our gear recommendations for getting started. Get it here.
And on the other end of the review spectrum you've got the personal opinion of the author. I love this camera because it takes photos.
As with almost all product reviews, the difficulty comes in marrying these two spectrums. To give a clear and laymen's-terms description of the product and its capabilities, but to also give a human touch. In the words of Stanley Kubrick, it's not just about the think of it, but also the feel of it.
My introduction to cameras nicer than my iPhone
It's been two years since I bought my first nice camera, and I'm so glad I did.
My son, Noah, was six months old at the time and as the holidays approach and I looked through my iPhone's camera roll I realize I had lots and lots of candid photos -- the good ones given the dignity of being touched up with an Instagram filter. And sadly, most of them were just dreadful on anything other than my iPhone screen.
This is, of course, not a knock against the iPhone as a camera, nor to say that people can't take amazing photographs with it. But I wanted something better. I wanted something of a higher grade and I wanted to learn how to use it well.
And so I bought the Olympus E-PL5, which I soon discovered was the best-kept secret of the micro four-thirds market. The E-PL5 is an incredible camera. Very small and lightweight but with a world-class sensor. I used it daily for about a year and a half until, as any self-respecting camera enthusiast would do, I upgraded.
Eight months ago I bought the Olympus OM-D E-M10, and boy is it amazing.

The Olympus OM-D E-M10 with the 75mm f/1.8 lens. This is a killer combo and it'll fit in the palm of your hand.
After two years of shooting with an Olympus Micro Four Thirds camera, this lineup's original appeal still holds true for me today. I have yet to feel frustrated by either of the cameras I've owned, nor have I ever felt held back in my "photographic vision".
The E-M10 has everything I like about its predecessor, plus everything I want from its top-of-the line sibling, the E-M1 (aside from 5-axis in-body image stabilization).
The E-M10 is inexpensive, small, and extremely capable. It takes sensational images and has excellent performance. It has access to the broad array of prime and zoom lenses available for the Micro Four Thirds format. The battery lasts forever. It's powerful enough that if you know about photography you'll appreciate its industry-standard controls and dials. Yet it's simple enough you can hand it to just about anyone and they could point and shoot it just fine.
Why Olympus Micro Four Thirds?
I know that if I had a bigger bulkier camera, I'd be much less prone to doing these awesome photos. Portability, affordability, and battery life are huge assets for me.
Some Background: The E-PL5
When I first bought the E-PL5 almost two years ago, my goal was straightforward: I wanted the smallest camera possible that took the best pictures possible that cost less than $1,000 with lens. The E-PL5 was brand new at the time, and so there weren't a lot of reviews out there about it. But what I did know about the camera was that it had many of the same internal photo-taking capabilities as the Olympus flagship camera at the time -- the E-M5 -- but without many of the "pro" features.
The E-PL5 has no manual dial controls. While you can adjust aperture / shutter speed / exposure on the fly, it requires a few taps and clicks of the menu dial because there are no dedicate control dials. The E-PL5 has no built-in flash (not that you'd ever use it anyway). And it has no electronic viewfinder. Which isn't a deal breaker, really.
After well over a year of consistently shooting with the E-PL5 I learned a few things about my photography habits: (a) I knew photography was something I was seriously interested in; and (b) I knew what features I wanted in my next camera.
After that first year with the E-PL5 there wasn't any camera I wanted to upgrade to. The obvious options at the time were the Olympus E-P5, E-M5, or E-M1. Or a Fuji x100s or X-Pro 1.
I'd spent time with both the E-P5 and E-M5 and didn't really like either of them. And I knew I wouldn't want the E-M1 because of its size. And I didn't want to go to Fuji because I'm still a fan of the micro four thirds systems and its amazing and affordable lens selection.
And so I was content with my E-PL5 and knew that one day I'd upgrade when the right camera came along. Well, the right camera did come along. The E-M10.

The Olympus OM-D E-M10
The Olympus OM-D E-M10
The E-M10 is the "entry level" camera to the OM-D series, which is Olympus' high-end line. I put entry level in quotes because oftentimes the connotation is that the entry level products are sub-par in some form or another. But with the E-M10, that's not the case. Though it doesn't have the 5-axis image stabilization, nor is it weather sealed, the E-M10 is smaller and less expensive than it's older siblings. And for me, the latter two features are more important.
Being smaller than both the E-M5 and E-M1, the E-M10 is almost exactly the same size as the pocketable E-PL5 (and now, E-PL7). However, the E-M10 packs a bit more punch than the E-PL5 and it offers quite a few more features which I make use of all the time.
When compared to the camera it replaced for me, the E-M10 is better because it has Wi-Fi, a better grip, the movie button is in a less prone-to-hit location, better D-Pad control buttons, built-in EVF, built-in flash, two manual control dials (the E-PL5 has none), two custom function buttons (the E-PL5 has 1), focus peaking, and its a more attractive camera.
The E-M10 is slightly worse than the E-PL5 in that it's slightly bigger (because of the EVF and flash that are on top), it's a few hundred dollars more expensive, and the flip-out display is not as adjustable.
Now, at the end of the day these pros and cons are six of one and half-a-dozen of the other. The basic quality of the images produced by the E-PL5 are on par with the quality of the images from the E-M10. The latter is not a significantly more capable camera, rather its a significantly more functional camera.

The E-M10 has two manual control dials which can control aperture, exposure, shutter, speed, and more. There are also two function buttons (Fn) that you can set to toggle any setting you want.
Most notably, what's awesome about the E-M10 is this:
-
Manual control dials: when you're new to shooting with a nicer camera, manual control dials seem ridiculously intimidating. I have no idea what adjusting the aperture or exposure even does, let alone know how to adjust them on the fly right as I'm trying to take a picture. But after you've been shooting for a little while you'll naturally just learn what these settings do. And so having the ability to adjust these on the fly goes from an intimidating and unnecessary feature to a must-have core function.
-
Wi-Fi: My snap-judgment of Wi-Fi was that it was a novelty feature. Neat, but not practical. But then I started using it. Now I often use the wi-fi to send an image to my iPhone, edit in the VSCO Cam app, and then upload to Flickr, Instagram, wherever. More on this below.
-
Focus peaking: Focus peaking is the camera's way of helping you know what areas of a photo are in focus. Thanks to Focus Peaking I've quickly acclimated to manually focusing my shots and I love it. Though I still mostly have auto-focus enabled, I have one of the function buttons custom set to allow me to switch between manual focus and auto focus.
-
3-Axis In-Body Image Stabilization: The image stabilization is going to be most helpful when shooting at very low light because in those situations the shutter speed will need to be slower in order to capture enough light for the photograph.
The E-M10's 3-axis IBIS helps counteract pitch, roll, and yaw. The E-M5 and E-M1 have a 5-axis image stabilization that also helps against horizontal and vertical movement. As awesome as that sounds, in my 2 years of shooting, I've had very few images that were blurry due to camera shake (even when shooting with the E-PL5 and it's "mere" 2-axis IBIS).
-
The "Trupix 7" image processor, which is same found in the Olympus flagship camera, the E-M1.
-
A better D-Pad: This may sound silly, but consider that the camera's D-Pad is a nontrivial user interface element. Among other things, it's how you navigate through the menu and it's how you adjust the placement of the auto-focus target (which is especially useful when framing an image using the EVF) d-ring on the E-PL5 started getting finicky on me after about 15 months. The d-pad on the E-M10 is much more stable. It's 5 buttons instead of a button and a dial.
Custom Function Buttons and Manual Control Dials
The E-M10 has two manual control dials and two function buttons. Within the settings you can map these dials and buttons to just about any function / feature within the camera. You can use them to toggle the timer, or to toggle one of the built-in art filters, or to go between JPG+RAW and RAW only. Just about anything, as I'll explain in a minute. And those are just the obscure possibilities. There are probably much more sane options that you would want use.
For example, here's how I have my function buttons and manual dials set up:
The Fn2 button, which is located right next to the shutter button, I have mapped to toggle between Manual Focus and Auto Focus. As I mentioned above, thanks to Focus Peaking, it's possible to manually focus the camera and get an in-focus image. And since I have focus peaking enabled for anytime I'm in Manual Focus mode, then I get the contrast highlighting automatically.
I think it works out well to have the manual focus / auto focus toggle on the button that is right next to the shutter. Because then I'm able to half-press the shutter button to get a quick auto-focus setting, and then switch to manual focus and go from there.
Another great thing about manual focus is when it comes to video. The E-M10 can shoot in 1080p HD and it looks great. But the last thing you want is awkward hunting for focus as you're talking into the camera. Opening up the aperture to get a broader depth of field and then setting the camera to manual focus will help quite a bit.
For the Fn1 button -- which is on the back, just above the back thumb -- I have mapped to toggle between Sequential shooting (a.k.a. Burst Mode) and single shooting. The E-M10's Burst Mode can take shots at up to 8 frames per second, which is great if you're trying to capture a photograph of your toddlers after giving them something with sugar right before bedtime.
However, setting the Fn1 toggle was a bit tricky. You can't just go in to the Fn1 button settings and chose Sequential Shooting as an option. And so, instead, you have to assign your "Myset" settings and then tell the Fn1 button to toggle the Myset setting. More on this in a minute, but basically there are some settings that automatically map to the Fn buttons and for others you have to set the camera up the way you want it and then tell it that the current state of Menu options what you want for the Fn button.
For the manual dials, the dial next to the thumb rest I have mapped to exposure and the dial that surrounds the shutter button I have mapped to aperture. I shoot almost exclusively in Aperture priority mode, and so these two settings are perfect if I want to quickly under- or over-expose an image or adjust the aperture depending on the depth of field I want.
The dials themselves are excellent. They are easy to adjust and give a satisfying click as you rotate them yet, they are not idly adjusted.
At the end of the day, these extra buttons and nobs are what make all the difference for me when it comes to the E-M10 over the E-PL5. Over a few years and several thousand photos made, I've learned a bit about my shooting style and how my camera works. And thus I know enough to know which adjustments and settings I want to have fast access to, without needing to dig into the Menu.

The Olympus E-M10 with the Panasonic Summilux 25 f/1.4 lens attached. Arguably the single best lens for the Micro Four Thirds system.
The Myset Settings
So, this is actually pretty cool. In the camera's menu, there are four "Myset" slots. And you can use each one to save a "snapshot" of the camera's settings at that state. And then, you can assign those settings to the function buttons.
It's not unlike if the driver's seat of your car has multiple settings for multiple drivers, that auto-adjust the seat's position.
To set a Myset setting, you simply click the Menu button on the back of the camera and then you'll see the 2nd option in the first Shooting menu is "Reset/Myset". Drill in and then chose one of the 4 Myselt settings. Drill down again and you're then given the option to "Set current shooting mode and settings".
To assign your Myset preset to a Fn button is a bit more tricky. You navigate to the Custom Menu (the one with the gears) → Button/Dial → Button Function → Fn1 or Fn2 → and then select the Myset you want (i.e. My1).
Wi-Fi and mobile photography
The E-M10 has built-in Wi-Fi. What this means is that the camera creates its own Wi-Fi network and then your iPhone join the camera's network. (The camera cannot join the Wi-Fi network in your house nor at the coffee shop. Nor can the Camera connect to your computer over Wi-Fi for endless mode, where you snap a photo and it's sent right to your computer.)
Once your phone is joined to the Wi-Fi network created by the camera, they can talk to one another. It's actually pretty great.
You can use the Olympus iOS app to:
-
Remotely control the camera. Not only can you have a live view of what the camera sees and even tap to focus, but you can also (obviously) remotely control the shutter. We used this to take some family portraits and it was great. Just set the camera up on a tripod and took a dozen photos. Much easier than me setting the timer and then running in to get in the shot, and hope all the little kids are smiling.
-
Add Geotag: The E-M10 doesn't have a GPS sensor, but the iPhone does. And so, when your iPhone is paired to the Olympus E-M10, when you take photographs then those images get geotagged in the EXIF data.
-
Import photos: you can save .jpg files right off the camera and on to your iPhone. This is awesome, and I'll talk more about it in the section below.
-
Edit photos: the olympus camera app has some pretty terrible one-tap filters and other features. They probably slapped this functionality into the app so it could be listed on a checklist somewhere. Any self-respecting, iPhone-carrying photographer will never edit their images using the Olympus app.
Importing photos to my iPhone using the camera's wi-fi connection
Before I bought the E-M10, I always considered in-camera Wi-Fi to be a gimmicky novelty. Something neat, but I figured I'd never use in real life.
Turns out, I have been using the crap out of the Wi-Fi.
It's awesome to snap some photos when I'm out and about and then import them to my iPhone and share them right away. The Wi-Fi has proven to be a critical feature for my camera.
My normal photo-editing workflow is that I usually go through a batch of photos about twice a month. And so, for images shot with my camera that I want to share right away I can grab them with the iPhone app, save them to my camera roll, and then email or text them to friends and family or post them to Instagram. My Instagram likes go through the roof when I post a photo that was taken with my E-M10.
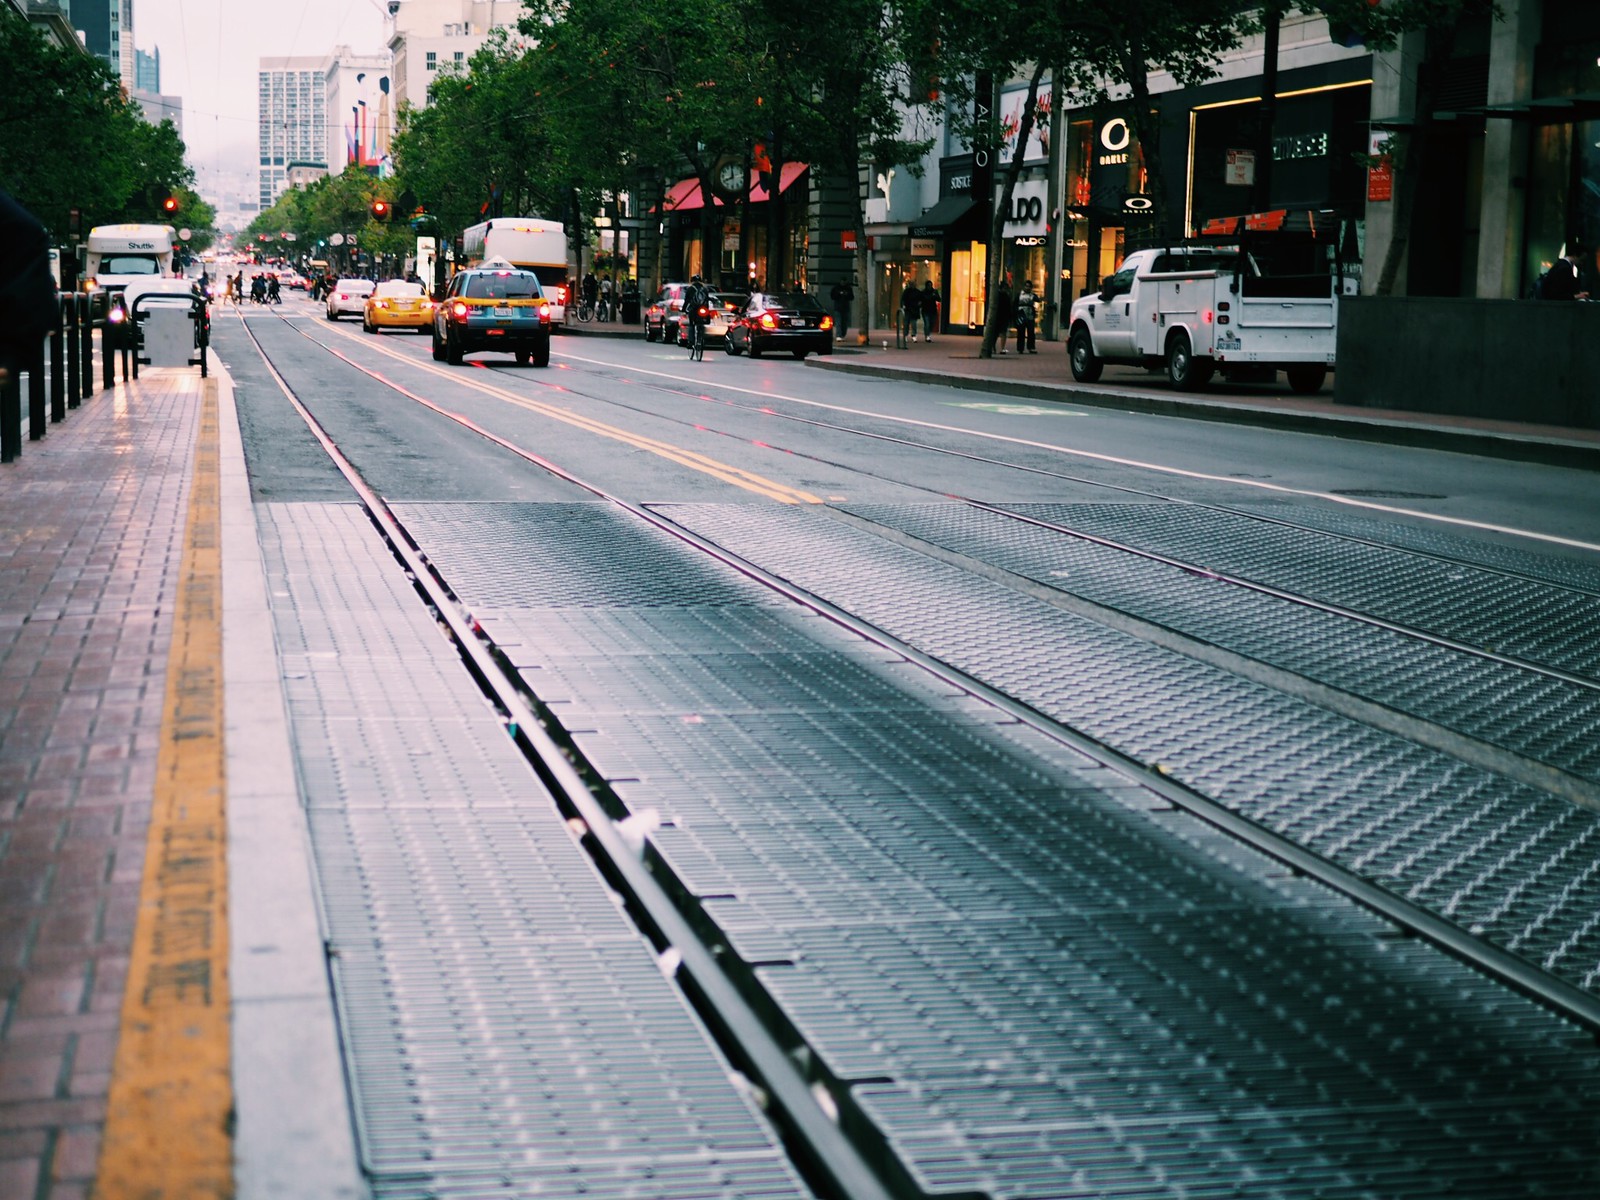
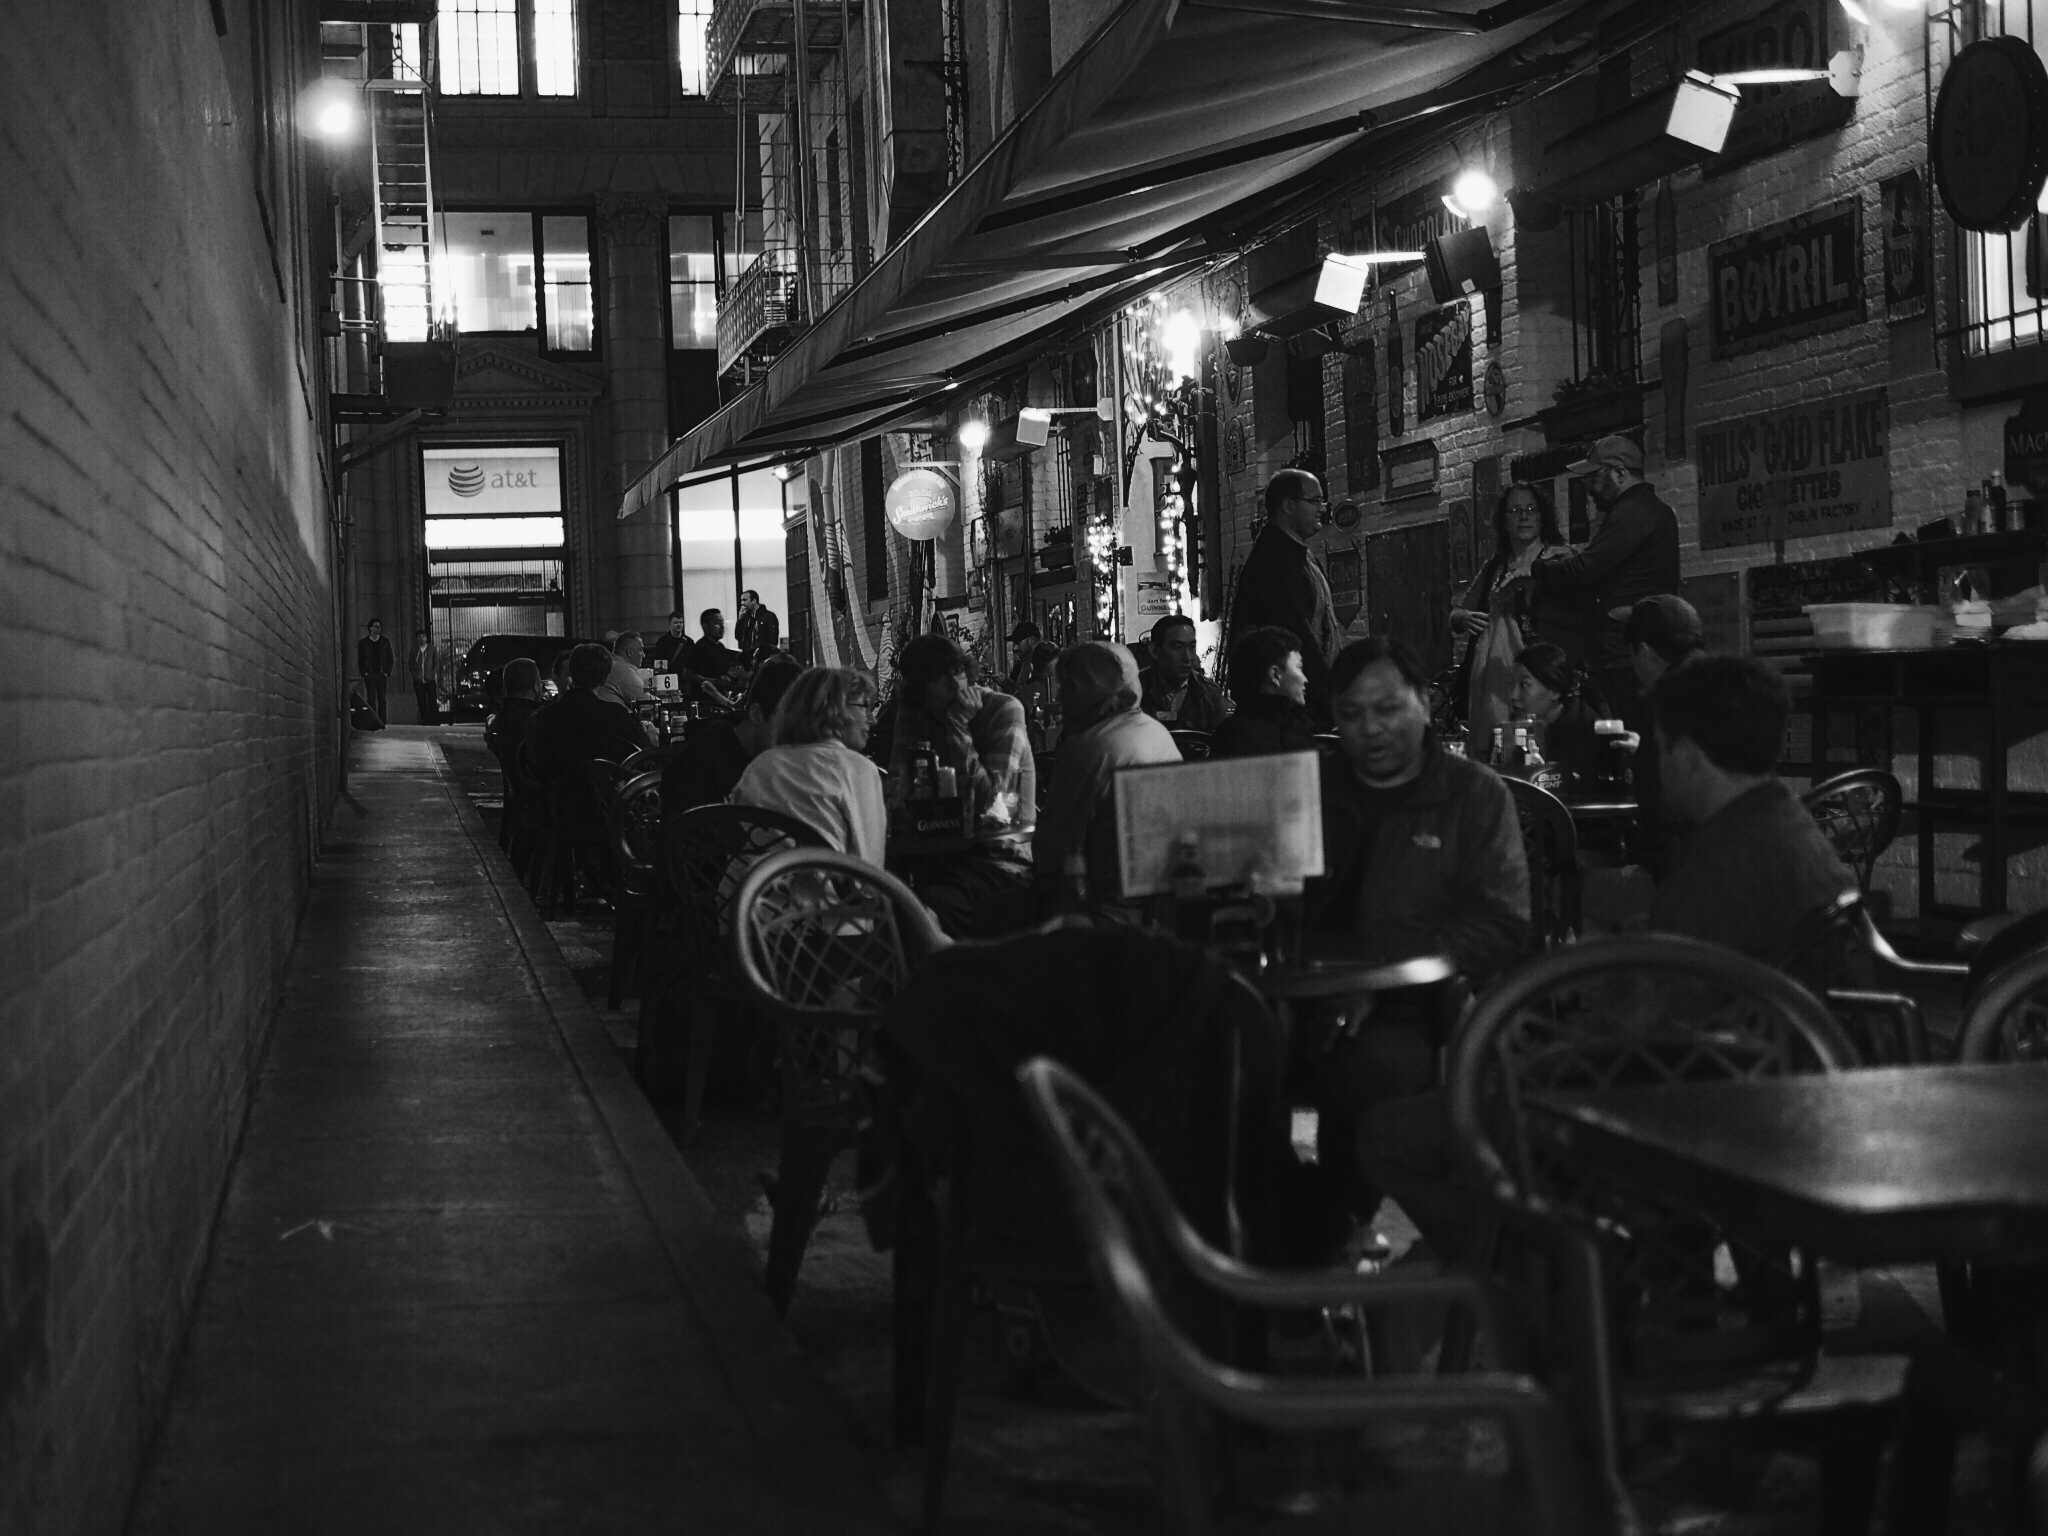
Here are some photos I took with the E-M10, edited on my phone using the VSCO Cam app, and then uploaded to Flickr using the iPhone Flickr app:
My biggest gripe is that the iPhone can only import JPGs from the camera. Which means if I'm shooting in RAW only, my phone won't see any images as being available to import.
And since my "mobile photography" workflow is not my primary workflow, Most of my images I edit in Lightroom on my Mac, and thus I prefer to shoot in RAW to have the best editing options. So, I have the camera set to shoot RAW + JPG. It's not ideal because it takes up extra space on my SD card, but it works. I recently purchased a few of the 32GB SanDisk Extreme Plus SD cards and they'll hold over 1,200 RAW+JPEG images (the SanDisk Extreme Plus is also pretty awesome because is blazing fast read/write speed. Which is the single most important factor of an SD card).
Free Photography Guide: Download our Better than iPhone Photography guide to help you get started with you photo skills and camera basics. Along with our gear recommendations for getting started. Get it here.
The Tilting View Screen / Touch Screen
On the back of the camera is a 3-inch tilting view screen, and it's fantastic. Now, compared to the "selfie-mode" of the new E-PL7, the E-M10's tilting screen is a bit more constrained. But it's by no means inefficient.
Placing your finger under the bottom edge of the screen and pull out and up, and you've instantly adjusted the screen so it's pointing up at an angle perpendicular to the camera body. This is perfect for holding the camera at waist level and simply looking down at the viewfinder to frame the shot and take it.
And the flip-out screen is anything but flimsy. The hinges are sturdy and it stays strongly in place.
The screen itself is a touchscreen. Tap on it to set the focus target; you can even set the camera to take a photo as soon as it's in focus. So you can tap to photos + instantly take a snapshot. When browsing through photos on the camera's card, you can swipe left or right to navigate, and even pinch to zoom in. It's not nearly as responsive or elegant as iOS, but it is nice.
And I recommend a screen protector for the E-M10. This Oleophobic screen protector is awesome. Not only does it help guard the screen itself against scratches, it's also helps keep down on fingerprints, just like the coating Apple puts on the front of their iPhones.
Viewfinder
As awesome as the flip-out view screen is, and as familiar as I am with framing photos using a view screen (both on the camera and on my iPhone), it's still so great to use an actual viewfinder.
Yes, the viewfinder is extremely helpful when out shooting in bright sunlight. And yes, it's also great for helping to steady the camera that much more. But I've found the viewfinder to be helpful in that when I'm using it I tend to slow down a bit and frame my shots better. It also helps when taking portraits of other people, in that they feel more comfortable looking directly into the camera since I'm holding it up at my own eye level.

The E-M10 has a built-in electronic viewfinder. It knows when you're looking into it and so the view screen turns off and the viewfinder turns on.
Battery Life
Battery life on the E-M10 is just wild. It reminds me of that of my Kindle or iPad. Chances are, when I pick it up to use it, it will have plenty of battery life.
For a more practical point of reference, the E-M10 lasted on a single charge for a 5-day trip to Portland, Oregon. I had the camera around my neck the my entire time at XOXO and the battery never faded. Now, I wasn't shooting wildly -- I captured about 175 photos of the event -- but I wasn't holding back either. My point being, for the average photography enthusiast, the battery life is well beyond sufficient. There is no question or worry about taking the camera out for a day (or several) of shooting and knowing that it will last.
Speed
How fast a camera is goes a long way in how frustrating it will or won't be to use. This includes how quickly it's ready to go once you've turned it on. How fast it can focus on a subject. And how fast it can write images to the card.
-
Startup: From the time I turn the camera on until it's ready to go, it's like 2 seconds. Or less. After flipping the on-switch, I take off the lens cap. By the time the lens cap is off, the camera is ready to get to work.
-
Autofocus: Olympus cameras are infamous for their near instantaneous autofocus speeds, and the E-M10 continues that tradition. Of course, much of the auto-focus speed is limited by the lens you're using. The 20mm f/1.7 pancake lens is a notoriously slow auto-focuser. My daily shooter is the 25mm f/1.4 lens and it's fantastic. It's instantaneous in good light and it's pretty great in low light. Shooting with a native Olympus lens, things are ever so slightly faster still. But more on lenses in a bit.
-
Shot to shot speed: The E-M10 has a burst mode, and your basic shot-to-shot speed is ridiculous as well. I can take a whole bunch of photos back to back to back to back without the camera holding out on me. As mentioned above, it also helps that I bought this SD card so the write speeds are pretty fast, this alleviates one of the biggest bottlenecks for shot-to-shot speeds.
Thoughts on a few popular lenses
Over the years I've used almost all of the best prime lenses for Micro Four Thirds. And there are a lot of them -- much to the praise of the M4/3 system.
The Olympus 17/1.8, the Panasonic 20/1.7, 25/1.4, and 42.5/1.2, and the Olympus the 45/1.8, and the 75/1.8.
This massive and impressive lineup of affordable lenses is one of the best things that Micro Four Thirds has going for it (and it has a lot of good things going for it). The biggest problem is deciding which lens to get first.
Of the bunch, my favorite is, by far, the Panasonic Leica 25/1.4. It's full of personality and character. It's fast, it's sharp, and it focuses quickly. It's bulkier than the 20mm f/1.7 lens but the autofocus speed is so much faster it's not even funny. And though Olympus makes some amazing lenses, I've always felt that when compared to a similar Panasonic lens (especially the Leica Summilux that is the 25/1.4) the Olympus lenses are bit more sterile.

The Olympus E-M10 with the Panasonic Leica Summilux 25mm f/1.4 lens. The daily rig.
I usually advise folks to get the 20mm f/1.7 pancake lens as their first Micro Four Thirds lens. It is inexpensive, it's very small and compact, and it can take some amazing photographs. I still have my 20/1.7 lens, but I almost never use it anymore.
The next lens I'd like to get is the Olympus 75 f/1.8. I rented it for a few weeks in August and wow. Just wow. It is an absolutely incredible lens. The build quality is outstanding -- it's heavy and solid. And the quality of images it's capable of making are just fantastic.

The Olympus 75mm f/1.8 lens is absolutely amazing. Solid build quality, extremely fast, and the images it produces are just wow.
Real Life
At the end of the day, here's the best I can say: this camera rocks. I use it constantly. I've never been frustrated with it, I've never felt held back by it, and the photographs I'm capturing are beautiful.
The images are amazing to me and my family personally, because they're family photos. But also, as a creative person, I think the images this camera produces are awesome. I use my own photos as my computer wallpapers, I have some of my "artsy" photos up in my office, and I'm proud to share my photography online.

Taken with the E-M10 and the Panasonic 25mm f/1.4 lens. This is inside the Canoe storefront in Portland, OR.

My friend, Chase Reeves, who was our host in Portland, OR during the XOXO festival. Photo taken with the E-M10 and the Panasonic 25mm f/1.4 lens.

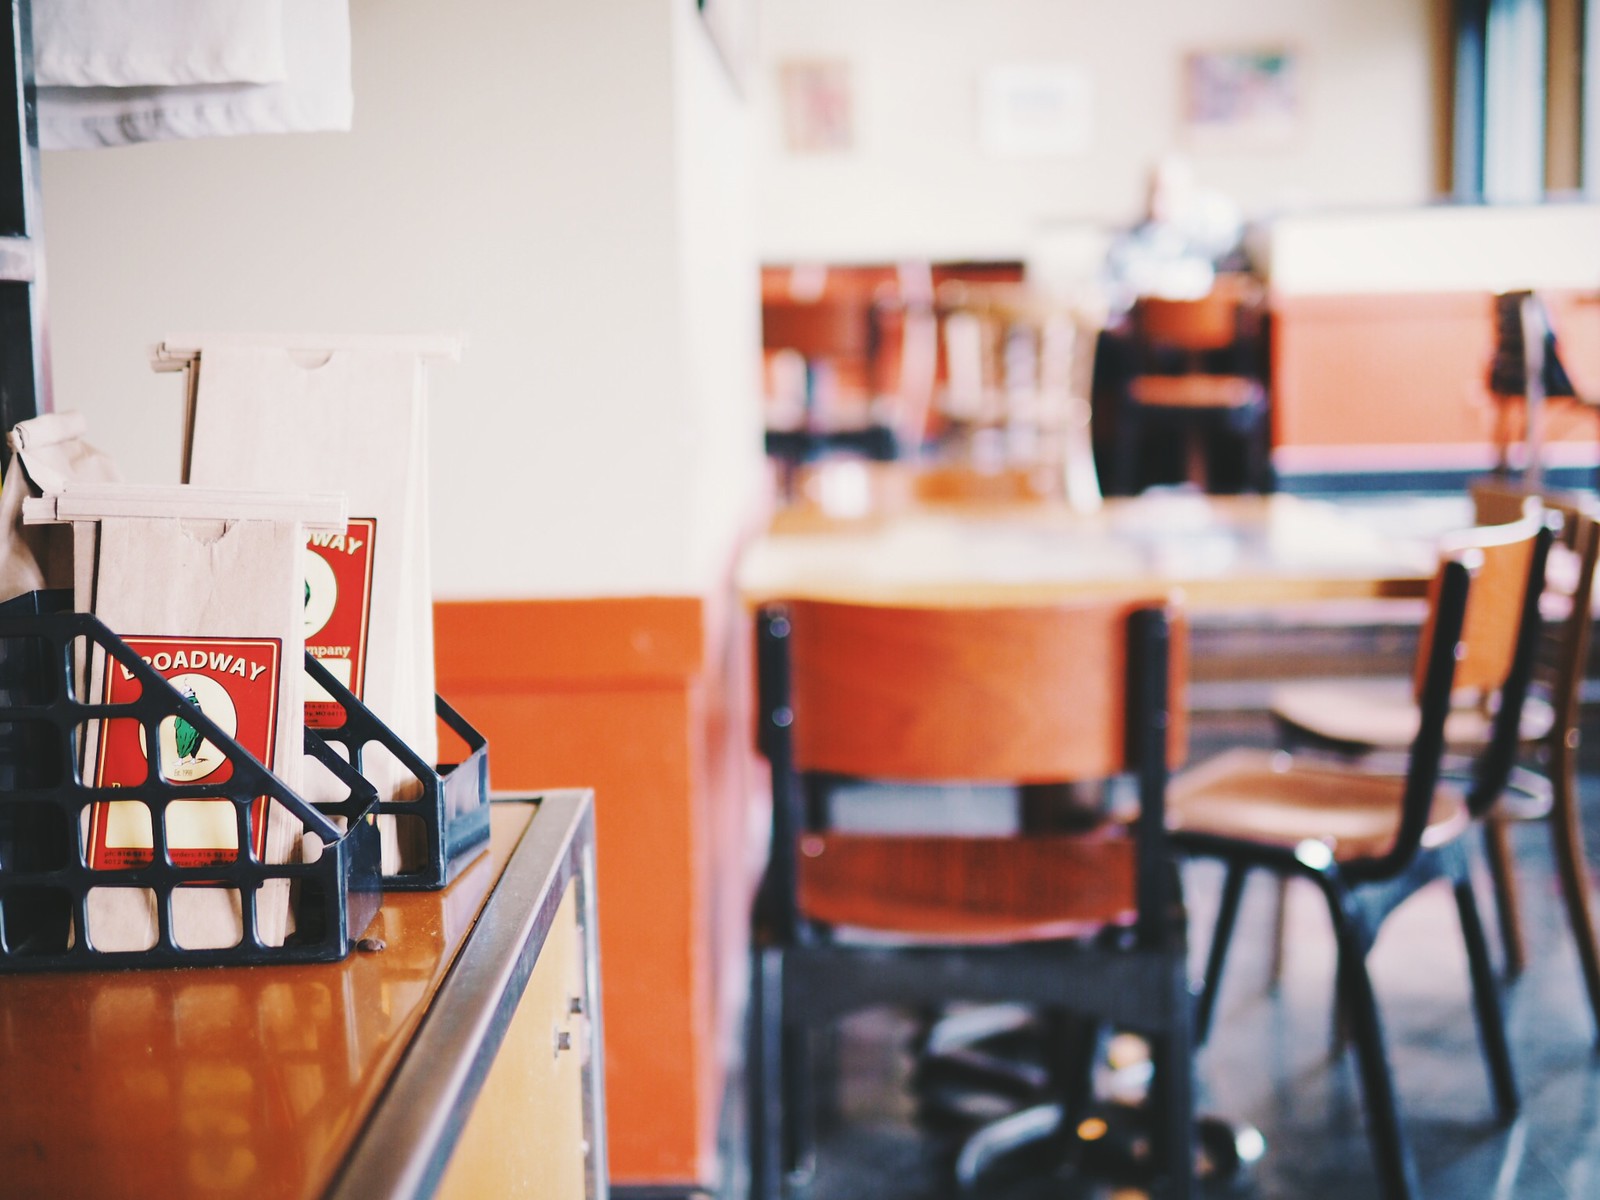
The barrista at P.T.'s Coffee in Kansas City. Making an Americano. Photo taken with the E-M10 and Panasonic 25mm f/1.4 lens.

A Honda scooterbike, somewhere in downtown Denver, CO. Photo taken with the E-M10 and Panasonic 25mm f/1.4 lens.

My son, Noah, learning to ride a tricycle at his grandparent's house in Colorado. Photo taken with the E-M10 and Olympus 75mm f/1.8 lens.

My wife and two boys. Photo taken with the E-M10 and the Olympus 75mm 1.8 lens.
Our home is now filled with images that I've taken over the years. In my office I have photos of my wife up by my desk. In our living are photos of our boys. Upstairs we have some cool "artsy" photos hanging in the bathrooms. On the fridge are other snapshots from the summer. We love having these great images all around our home. And every Christmas we put together an Apple photo book with the best photos from the year.
Not only do I love the creative outlet of photography, I also love being surrounded by great photos of the people whom are the most dear to me. As awesome as the iPhone is, this level of photography never took off for me until I had a nice camera.
Free Photography Guide: Download our Better than iPhone Photography guide to help you get started with you photo skills and camera basics. Along with our gear recommendations for getting started. Get it here.